Week 1 is Herringbone stitch.
I looked at Sharon's whole pile of interesting examples, and noticed that one of them kind of looked like chicken wire/cyclone fence wire ... and an idea started to form in my mind ... why not do some chicken wire on my block/whatever (the idea came a day or 5 before I actually decided what I was going to do these stitches on ;-)
... then I got to thinking about how I already have some bits set aside to make my Decmember Journal quilt (from last year - I still have December and August to make and November to finish the last little bit of) and some of those bits are a couple of odd shaped bits that were cut from ... wait for it ... chicken wire! ... funny how some things kind of pop up out of nowhere and then the same thing pops up again a few days later and/or somewhere else - like an idea wants to make sure it comes out one way or another ... so I got to wondering if, for my bit of herringbone stitch, I might be able to do a peice of chicken wire/fence that had been cut - like I have broken out from wherever I don't want to be ... or something weird like that ...
anyway ... this is what I ended up with:

... someone tell me WHY I chose to do this challenge, which I intend to take and post photos of, using SHINY BLACK fabric? ... especially when I already know, from prior experience (with trying to phtograph other shiny black quilty things, like my Janurary journal quilt last year!) that shiny black fabric quilts/etc are something that is VERY hard to take a decent photo of!
I took several photos (both last night and today) of this stitch, ditto with the other one, and ... maybe shiny thread also wasn't a good idea for something I want to photograph - I ended up with several out of focus pictures (but that is usual ... even the newer digital cameras still have a bit of trouble with black/shiny/close up/badly lit stuff) and a few where the flash is shining off the thread so much that I can't see the stitching at all ... and this one - I played with the colours/etc (with photo editing software) of a few of the pictures, but I ended up leaving this one the colour it was because when I thought about it - I realised that the fabric probably WAS this colour at the time - I took this photo outside, in a hurry (the TV show I wanted to watch was about to start ;-) just before sunset this evening ... so I think that golden glow was probably really there ...
The stitching was done in some shiny silvery stuff that likes to shred itself as I sew (grrrr) ... the herringbone was worked in horizontal rows ... I started at the bottom of the photo ... and worked the rows back and forth in 2 directions (so I had to turn the work upside down for every other row).
Week 2 is Buttonhole stitch:
There is one variation of buttonhole stitch that I came up with a year or 3 ago, and have done on a few things now, it is nothing fancy and the same thing has probably been done by other people before anyway, but I hadn't seen the exact same thing when I came up with it ... I was sewing pretty seams onto some crazy block or another and trying to decide what to do that wasn't just boring buttonhole/blanket stitch with the "ends" all the same size and this idea kind of "fell out of my needle" ... I think I did 2 or 3 stitches of different heights and then realised I could make it look like the markings on a ruler ... I think I did a couple variations on that block - I had to have one in cm and one in inches ;-)
Anyway, even though I also had another idea I wanted to fiddle with, I decided that I would do a seam of buttonhole ruler markings on the block as well - so here it is:

yes - mostly out of focus (the other 5 photos I took were worse), and I had to fiddle to get the colours right (the black looked brown in the photo) ... but you should be able to see what I did - this one looks like a ruler that has 1/4" graduations ... except the "inches" are NOT an inch long on the block (they are closer to 1cm ;-) ... I don't intend to use it to actually measure anything, I just wanted it to look a bit like the markings on a ruler ...
The other idea I had was to do a circle of buttonhole so it sort of looks like a star, and this is what I ended up with:

The dots at the ends of the stitches are French Knots - they were part of my original idea - I like using knots or tiny beads at the ends of things like this. I did the first circle of buttonhole stitch (the larger circle with the shorter "spokes"/ends/whatever u call them) and the French knots on the ends, and I decided it looked a bit bare with the stitches so far apart (they were sort of closer in my mind but that didn't happen when I actually stitched it) so I did what I often do - came up with an even better idea to "fix" something that didn't work as intended - and added the second circle of buttonhole stitches (and the knots on the ends of them) and I liked what I ended up with ... but - me being me - I just HAD to add the blue knot in the middle ... but I think that makes it even better ... kind of gives it a middle ... and makes it sort of look like an eye ...
I have also been uploading a pile of other photos onto this computer while typing this (the same lot I was putting on the other computer while typing the stuff I posted here on Saturday ;-) and while I was doing that, and this, I have also been having a bit of a poke around in some other photos ... I found this one:
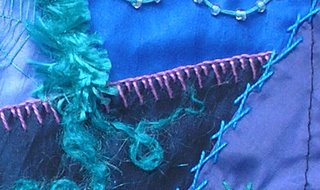
... actually it is part of a bigger one I found, but I cut out the relevant bit to put here - it was a crazy block I made for Mum, and this bit has a sort of ruler thingy (except the stitches are only 2 different heights so I guess that one is a cm one marked every 5mm? ;-) and some of the sort of herringbone I usually do ...
- actually there are 2 variations of herringbone I have done on various crazy blocks/quilts/etc - I often do this basic one and sometimes I get a bit more fancy and do the one where you do stitches over where the bits cross over ... I think I do most of my "getting fancy" by using different threads or fancy yarns, or adding weird beads/motifs/etc, rather than doing complicated stitches ... mostly I kind of do what comes to mind when I look in my stash to find threads/yarns/beads/etc that go on whatever it is I am working on ... and I use the fluffy/etc yarns and stuff because I like them ... but I often do some sort of stitching experiment on whatever it is that I am making ...
Oh Ok ... if you insist (I guess I was planning to put a photo of this in here sometime anyway) - here is the whole block:

The "experiment" on this block was a couple of swirly "S" shaped thingys done with beads- one spiralling in to a sequin (the one just above and to the right of the blue butterfly motif) ... actually the block next to it was also an experiment - it is coloured wool that was trimmed off the end of a felted scarf someone was making, sewn down with some matching thread. Beside that is a spider on a web - I try to do one of those on all the crazy quilts/blocks I make, then next to that is the other swirly beaded thingy I was talking about - seed beads spiralling in to a sequin, but this time I threaded some matching thread (2 strands of pearle 8 I think?) through the beads after I had sewn them on.
Now I really should stop raving on, and also not do any more rummaging around in my photos, and go to bed - if I go now, I might just have time to get to sleep before DH has to get UP to get ready for work ... if you have not already guessed - yes - I am still on holidays ;-)
oh - btw - all these photos should (provided this works like it usually does) also be clickable links to the full sized versions, if you want a "closer" look at some of them.
goodnight ...


No comments:
Post a Comment
Feel free to have your say ... I will read it eventually ... and maybe even answer you, if you asked a question ;-)